How to Fix a Running Toilet: A Step-by-Step Guide
A toilet that keeps running after you flush is more than an annoyance: it wastes water around the clock, adds to your water bill, and can mask a small leak that slowly gets worse. The good news is that most running toilets are caused by one of three parts inside the tank — the flapper, the fill valve, or the overflow tube — and all three are cheap to replace and straightforward to fix. This guide explains how to fix a running toilet step by step, starting with a quick diagnosis so you replace the right part the first time.
Before you start, gather a few basics: rubber gloves, an old towel, a sponge or cup for bailing water, and an adjustable wrench. You do not need to turn off the water to diagnose the problem, but you will need the shut-off valve behind the toilet when it comes time to replace a part, so find it now and check that it turns. If the valve is stuck or corroded, do not force it — a plumber can replace a seized valve quickly, and forcing it risks a leak. Finally, take a photo of the inside of the tank before you touch anything, so you can put every part back where it belongs.
Step 1: Take the Lid Off and Watch the Tank
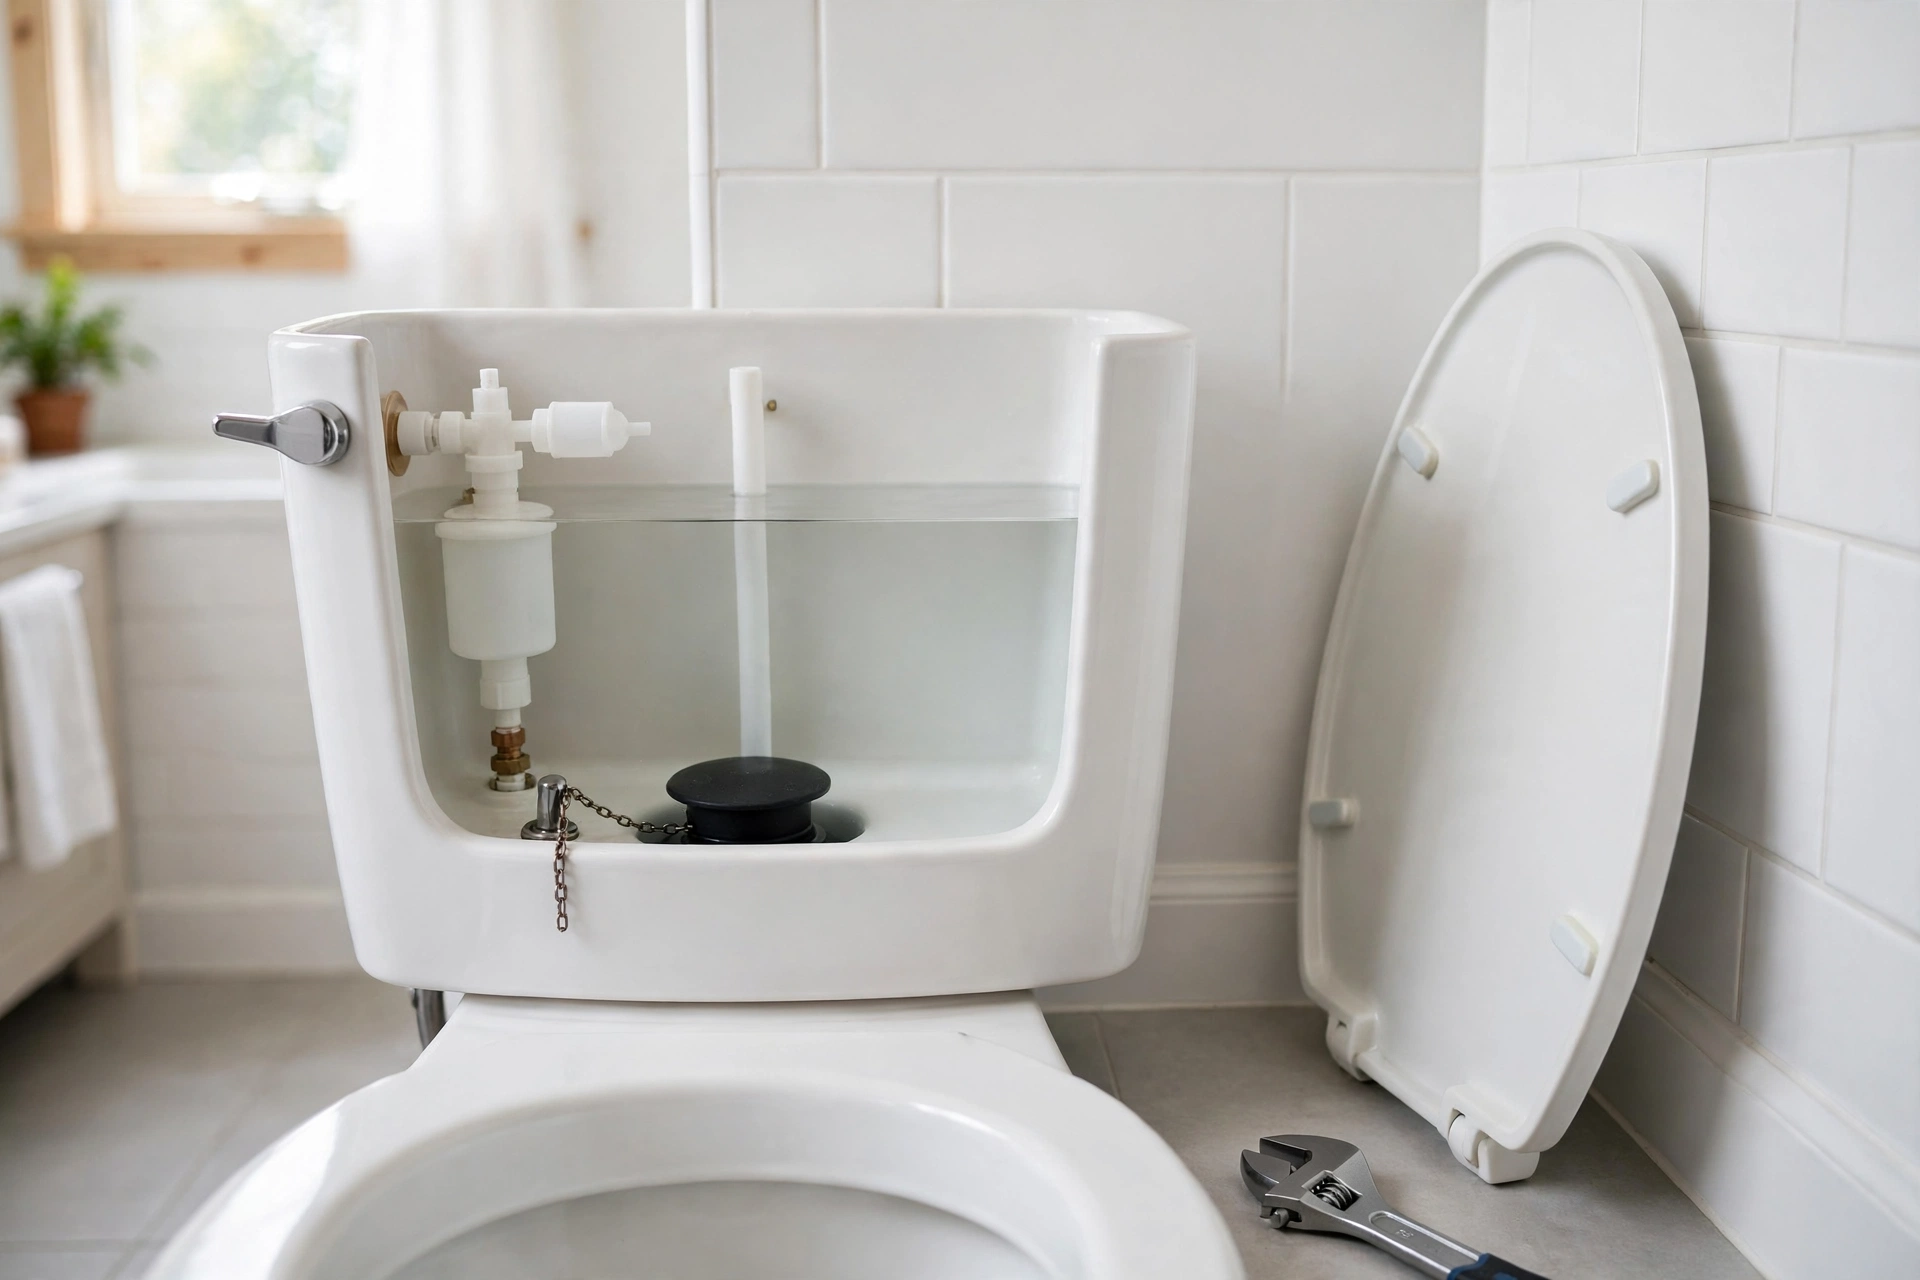
Learning how to fix a running toilet starts with watching, not wrenching. Lift the tank lid carefully — it is heavy ceramic and it chips easily, so set it on a towel on the floor — and flush the toilet while you watch what happens inside. A normal flush goes like this: the flapper lifts, water rushes into the bowl, the flapper drops back down to seal the tank, and the fill valve refills the tank to the marked water line, then shuts off. A running toilet breaks this cycle somewhere. Watch for these clues: if the water keeps trickling into the bowl long after the flush, the flapper is probably leaking. If the water level rises into the overflow tube and never stops, the fill valve is set too high or is failing. If the tank refills and then starts again every few minutes on its own — a phenomenon sometimes called “ghost flushing” — the flapper is almost certainly letting water seep into the bowl. Identifying the symptom first saves you from replacing the wrong part.
Step 2: Check the Water Level
The water level in the tank should sit about an inch below the top of the overflow tube — the tall open pipe standing in the middle of the tank. Most tanks have a water line marked on the inside wall. If the water is reaching the top of the overflow tube and spilling into it, the fill valve is letting in too much water. Lower the level by adjusting the float: on a ball float, bend the arm down slightly or turn the adjustment screw; on a cup-style float that slides on the fill valve, squeeze the clip and slide the float down. Flush and watch again. If the water now stops at the right level, you have fixed the problem in under a minute, and no parts are needed.
Step 3: Inspect the Flapper
The flapper is the rubber disc at the bottom of the tank that seals the hole to the bowl, and it is the most common cause of a running toilet. Rubber wears out over time, especially in homes with treated water, and a warped or cracked flapper lets water leak into the bowl constantly. Lift the flapper and run your finger around its sealing edge — if it feels rough, warped, or leaves a dark residue on your fingers, it needs replacing. A simple dye test confirms the leak: put a few drops of food colouring in the tank, wait fifteen minutes without flushing, and check whether the bowl water has changed colour. If it has, tank water is leaking past the flapper. Replacing a flapper is easy: unhook the old one from the pegs on the overflow tube, take it to the store to match the size, and clip the new one in place. Check the chain too — it should have about half an inch of slack. A chain that is too short holds the flapper slightly open; a chain that is too long can slip underneath it and stop it sealing.
Step 4: Test the Fill Valve
If the flapper is sealing well and the water level is correct but the toilet still runs, the fill valve may be failing. The fill valve is the tall assembly on the left side of the tank that refills it after a flush. Signs of a failing fill valve include a hissing sound that never stops, a valve that runs slowly for a long time, or a valve that starts and stops on its own. Try cleaning it first: turn off the water at the shut-off valve, flush to empty the tank, and remove the cap on top of the fill valve to check for grit or sediment in the strainer. Rinse it out, reassemble, and turn the water back on. If the valve still misbehaves, replacing it is the next step. Fill valves are a standard part, and most come with clear instructions and an adjustable height, so you can set them to match your tank.
Step 5: Replace the Fill Valve
Replacing a fill valve is the most involved job in this guide, but it is still a beginner-friendly repair that takes about thirty minutes. Turn off the water at the shut-off valve and flush the toilet, holding the handle down to empty as much water as possible. Sponge out the remaining water from the tank. Disconnect the water supply line from the bottom of the fill valve with your adjustable wrench, keeping the towel handy for drips. Unscrew the lock nut under the tank and lift the old valve out. Set the new valve to the right height — the top should sit a little above the overflow tube — insert it through the hole, tighten the lock nut from below, and reconnect the supply line. Attach the refill tube so it clips into the overflow tube, turn the water back on slowly, and check for leaks at every connection. Flush a few times and set the water level as described in step two.
Step 6: Check the Overflow Tube and Refill Tube
Two small parts can cause a running toilet that is easy to miss. The overflow tube sets the maximum water level, and if it is cracked below the water line, water leaks into the bowl through the crack — the only fix is replacing the flush valve assembly, which is a bigger job and a fair point to call a plumber. The refill tube is the small hose that runs from the fill valve into the overflow tube; it should sit just inside the top of the tube, not pushed deep down inside it. If it is pushed too far in, it can siphon water out of the tank continuously. Pull it up so it clips neatly at the top. These checks take seconds and solve a surprising number of stubborn running toilets.
How to Fix a Running Toilet When the Problem Keeps Coming Back
If you have replaced the flapper and the fill valve and the toilet still runs, work through this short checklist. First, make sure the new flapper is the right size and type for your toilet — a flapper that is too large or too small will never seal properly. Second, check that the flush valve seat, the rim the flapper sits on, is smooth and free of mineral buildup; a rough seat can be gently cleaned, but a pitted or cracked seat needs the whole flush valve replaced. Third, check the tank-to-bowl bolts for leaks, since water escaping there can look like a running problem. And if the toilet is very old and parts are hard to match, a complete rebuild kit — flapper, fill valve, and flush valve together — is often the simplest solution, because every seal inside the tank is new at once.
When to Call a Plumber
Most running toilets are a do-it-yourself fix, but there are times to stop and get help. Call a plumber if the shut-off valve is stuck or leaking, if the porcelain of the tank or bowl is cracked, if the overflow tube itself is damaged, or if the toilet runs even after a full rebuild. The same applies if you find water on the floor around the base of the toilet, which can mean a failed wax seal rather than a tank problem. A professional can also help if your home has very old plumbing or low water pressure that complicates the repair. There is no shame in handing a job over — the goal is a quiet toilet, not a plumbing badge.
Preventing the Next Running Toilet
Once your toilet is fixed, a little upkeep keeps it quiet. Avoid drop-in tank cleaners, which can warp the flapper and damage rubber seals over time — clean the bowl instead. Once a year, lift the lid and check the flapper for wear, the chain for the right amount of slack, and the water level against the mark. If your water is hard, mineral buildup can shorten the life of tank parts, so consider whether your home would benefit from treatment; our guide to whole-house water softener systems explains the options. And if you are working through a list of small home repairs, our guide to how to reseal windows covers another easy weekend fix, while a tankless water heater installation is worth reading about before you plan a bigger plumbing project. Knowing how to fix a running toilet is one of the most useful basic home skills — it saves water, saves money, and turns an irritating sound into a quiet bathroom again.
Frequently Asked Questions About How to Fix a Running Toilet
Why does my toilet keep running, and where do I start with how to fix a running toilet?
A toilet usually keeps running because the flapper leaks, the fill valve fails, or the water level is too high. The first step in how to fix a running toilet is to watch the tank during a flush and see which of these three is happening.
How to fix a running toilet caused by a leaking flapper?
To confirm a leaking flapper, put a few drops of food colouring in the tank and wait fifteen minutes without flushing. If the bowl water changes colour, the flapper needs replacing — and that is the most common fix in how to fix a running toilet.
How to fix a running toilet without calling a plumber?
You can learn how to fix a running toilet as a do-it-yourself job: adjusting the water level, replacing a worn flapper, and replacing the fill valve are all beginner-friendly repairs with basic tools.
How to fix a running toilet when the water level is too high?
If the water reaches the top of the overflow tube, lower the float: bend a ball float arm down slightly, or slide a cup-style float down its rod. If the water then stops at the marked line, you have completed how to fix a running toilet in under a minute.
How long does a toilet flapper last?
A flapper is a rubber part that wears out over time, especially in homes with treated water, so check it once a year for warping or cracks. Replacing it at the first sign of wear is cheap insurance, and it is a routine part of how to fix a running toilet.